
The standard technique for implementing multilingual pages with the Multilingualizer is our on-page translation system. Below, we describe an alternative technique which allows you to create language-specific pages.
How to choose which technique to use
With our standard on-page translation system you benefit from not having to create a page for each language. This reduces your maintenance costs and simplifies things massively. One downside to on-page translations is that Google and Facebook will see the raw content – that means, depending on the length of your text blocks, users may see two or more languages in the snippets for those pages.
If this is an issue for you, you can use language-specific pages.
Another reason you might like to use language-specific pages is that you may have some third-party widgets which are specific to a single language. By creating a page per language, you can add whatever you wish to the English or French page and never worry that these scripts will not work.
We recommend using on-page translation under normal circumstances to reduce your maintenance burden and simplify things, but if you have some cornerstone content – content that counts as key landing pages for you – and the snippet that appears in Google needs to be tailored per language, then language-specific pages can be used for those pages.
Benefits of language specific pages
The following benefits exist for language-specific pages:
- Google, Facebook, Twitter (etc) snippets will only ever be in the language of this page
- You can translate the URL into the language, potentially boosting SEO
- You can add language-specific widgets which may otherwise not be possible through on-page translation
Below, we step you through setting up your first language-specific page.
How language-specific pages work
Our implementation of language-specific pages is very simple.
- Any pages with a {en} style code in the page title will be hidden for non-English language visitors.
- When the user changes language, the Multilingualizer will attempt to redirect the user to the equivalent page in this new language
Choose the first page you want to be language specific
It is entirely up to you which pages you implement as language specific. We recommend that you do this with your site’s cornerstone content, these are the most important pages on your site, the ones that ones that you want to rank highest on Google.
If you are altering an existing page that uses on-page translations, you should create a duplicate copy of it.
Create the language specific page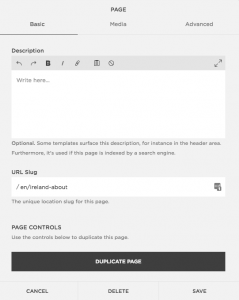
Within the pages menu of your website builder, you can either create an entirely new page or you can duplicate an existing page.
In Squarespace, for example, you do this by clicking on the setting wheel next to the page title and the option to duplicate is at the bottom of the menu that pops up (see pictured)
- Add a language code within curly braces to the end of the page title as appropriate. e.g. {fr} or {en}
- (optionally) Add the same 2 letter language code to the url slug in this format: /en/pagename format (see pictured)
By adding the language code to the url slug, we can later tell Google Webmaster Tools which set of pages are COUNTRY-specific. This is an optional step, and should not be used if these pages are only language-specific. Instead, allow Google to figure out the content of the page (it’s very good at this).
You can see a list of the 2-letter language codes here:
https://en.wikipedia.org/wiki/List_of_ISO_639-1_codes
Add your new page to your menu
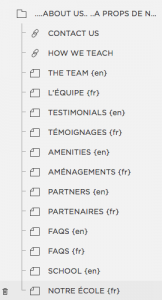
Add the new page to your menu. If this is your first page, you can just add it directly. If it is a second or third page, you should add them next to each other and in the same order as the order in your language selector.
For example, if you configured your languages as English, Spanish, French, you should add equivalent language-specific pages in the same order, next to each other in the menu. e.g:
- About us {en}
- Sobre nosotros {es}
- à propos de nous {fr}
The reason for this is that with language-specific pages, when a user lands on About us {en} and then changes language, for example to French, the Multilingualizer will attempt to figure out the correct alternative page to redirect the user to.
i.e. in this case, when they change language to French, they will be automatically redirected to the à propos de nous URL.
Note: If a user has a cookie set for French, and they manually enter one of your English URLs, they will see that page in English. The Multilingualizer does not force a redirect to happen when the user lands on a page, only when they click to change language.
Rinse and repeat the above steps for all pages you wish to make language-specific.
(Optional) Configure 301 redirects
If you have altered existing URLs – e.g. /about-us/ -> /en/about-us/ then it’s important to set up 301 redirects. A 301 redirect tells all browsers, and Google, where the new page exists. So, if someone visits /about-us/ they will automatically be redirected in their browser to /en/about-us/.
These are the official guides for adding a 301 redirect on Squarespace, Shopify and Wix. Basically, you provide the old URL and the new URL location and your web platform will automatically send users to your new URLs.
(Optional) Test your site links & URL structure.
We recommend using Screaming Frog to test your site for broken links and visualise the url structure (see the video below).
https://www.screamingfrog.co.uk/
Install, enter your URL in the bar at the top, hit start and then look for 404 (missing URL) errors in the report it generates.
(Optional) Add ‘change language and change page’ functionality
If you are implementing a cover page, and you’d like to change language and move the user to a page specific to that language, you can do that as follows:
On your cover page, implement a button with the following in place of the URL:
javascript:changeLanguageAndMove(0, 'https://www.yourdomain.com/english-landing-page');
The above would be for your first language (e.g. if you have English and French, then the 0 represents English)
Then you’d change the French URL to:
javascript:changeLanguageAndMove(1, 'https://www.yourdomain.com/french-landing-page');
This function will change the language AND change the URL.
Another example of language specific pages
Here is how you would implement the CONTACT US page in your menu if you want different URLs for each:

Important stuff:
- Use the correct 2 digit country code inside {braces} in the page title
- Put the pages at the SAME LEVEL in the SAME ORDER as your language selector
- For language-specific pages you MUST have a page for each language
- You can put these pages in sub-folders if you wish, so long as each page variation is also at the same level inside the same folder.