
You can leave it up the Multilingualizer to detect the language of the user, if you wish, or you can add a language selector to allow your users to choose. There are two options.
Option 1 – add a floating language selector
This option works on all platforms.
Copy and paste the code from the Language Selector Code (below) into your website.
Squarespace
Paste the language selector code into Advanced->Settings->Code Injection->Header
Shopify
In Shopify, Click Themes, Click the … button, click Edit HTML/CSS, click theme.liquid, scroll to the bottom and paste the code before the closing </body> tag.
Wix
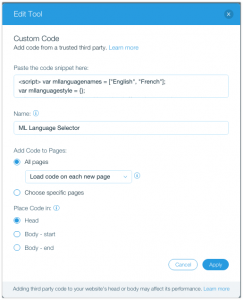
In Wix go to Manage Website -> Tracking and Analytics -> Add New Tool -> Custom and fill the box in as pictured.
Other Platforms
In other platforms, paste the code before the closing </body> tag.
You can customize the appearance of this floating language selector by using the guides below.
Language Selector Code
The following code has been written so it should be easy for you to customise the appearance of your language selector. You can alter the values in the code below to position the language selector wherever you wish, and style it how you like.
<script> var mllanguagenames = ["English", "French"];
var mllanguagestyle = {};
mllanguagestyle.verticalposition = 'top'; // can be top or bottom or 10px or 100px etc
mllanguagestyle.horizontalposition = 'right'; // can be left, right, or 10px for 10 pixels from left or -10px for 10 pixels from the right
mllanguagestyle.font = 'inherit'; // will inherit the font from the body paragraph elements, or you can specify a font
mllanguagestyle.fontsize = 'inherit'; // inherit or you can set 12px or 15px etc
mllanguagestyle.backgroundcolor = '#000000'; // can be any color you wish
mllanguagestyle.fontcolor = '#ffffff'; // can be any color you wish
mllanguagestyle.layout = 'vertical'; // can be vertical or horizontal </script>
<script type="text/javascript" src="https://www.multilingualizer.com/mlcode/languageselector.js"></script>
Use flags instead of text in the floating language selector
If you would like to use flags you need first the URLs for your flag images – once you have these, replace the png URLs below with your own flag image URLs.
Then paste this code into the relevant area for your platform as per Option 1 above. Note: for flags, paste this code *instead* of the code above.
The code below forces flag images to a height of 30px (pixels). You can edit this to 40px or whatever you like if you want them to be larger. You can use any image from anywhere.
<div class="languagewrapper">
<div class="language"><a href="#" onclick="languageClicked(0);"><img src="http://yourdomain.com/englishflag.png" /></a></div>
<div class="language"><a href="#" onclick="languageClicked(1);"><img src="http://yourdomain.com/frenchflag.png" /></a></div>
</div>
<style>
.languagewrapper {
position:fixed;
top:0;
right:0;
z-index:999999;
background-color: black;
padding: 2px;
}
.languagewrapper .language img {
height:30px;
}
.languagewrapper .language {
float:left;
}
.languagewrapper .language {
display:block;
}
.languagewrapper .language.active {
display:block;
}
.languagewrapper .language.active a {
color:white;
font-weight:bold;
}
.languagewrapper .language a {
padding:2px 5px;
text-decoration:none;
color:white;
}
</style>
Option 2 – add the language selector to your existing menu system
This option works on Squarespace and Shopify, as well as other platforms, but not with Wix.
- Click the button in your website editor to add a LINK/HYPERLINK/URL to your menu
- Enter a text name for your first language selector, e.g. English or EN and then instead of a URL insert the following:
javascript:languageClicked(0);
- Repeat for your 2nd language – add a link/hyperlink/url, enter the text for the 2nd language selector e.g. FR except this time instead of the URL insert the following:
javascript:languageClicked(1);
Repeat the above for all your languages, increasing the number inside the brackets by 1 for each extra language you have.
If you find your platform is adding http:// or https:// to these URLs automatically, please add the following code – I’ve seen this happen on webflow and some other platforms. Add this code to your header or footer injection area, below where you added the Multilingualizer code:
jQuery(document).ready(function() {
    jQuery('nav a').each(function() {
        if (jQuery(this).attr('href').includes('javascript:') && jQuery(this).attr('href').includes('://')) {
            jQuery(this).attr('href', jQuery(this).attr('href').replace('https://', ''));
            jQuery(this).attr('href', jQuery(this).attr('href').replace('http://', ''));
        }
    });
});
Example Adding a Link in Squarespace

Change language AND change page
Create a URL link in your menu and enter the following instead of the URL:
javascript:changeLanguageAndMove(0, '/');
This will switch to language 0 (whichever you have set as language 0) and move to your home page.
or
javascript:changeLanguageAndMove(1, '/specific-page/');
This will switch to language 1 (whichever you’ve set as language 1) and move to /specific-page/ on your website.